
Sensation Testing - Peripheral Nerve Lesion
Understanding the difference between central and peripheral, or upper and lower motor neurone lesions is pertinent to any neurological examination. When suspecting a central nervous system lesion it is important to assess different facets of sensory integration. For example, light touch, two-point discrimination, temperature discrimination, sharp/blunt, kinaesthesia, proprioception, stereognosis etc. as these assessments differentiate different aspects of the the somatosensory system. In a previous blog, Alicia describes sensation testing for a central system lesion and the procedure for many clinical tests. This blog is a continuation on the topic of sensory testing and how it might differ for a peripheral nerve lesion. Both of these blogs focus primarily on somatosensation, which is the integration of sensory information received from the skin and musculoskeletal system, and is different from sensory integration from our sight, smell and vestibular systems.
Sensation testing is about understanding sensory integrity and it gives us objective data about integration between the CNS and PNS, and is important because we cannot directly observe CNS processing with our clinical physical assessments. The primary purpose of a sensory examination is to evaluate sensory integrity and to assess the distribution and characteristics of the sensory impairment. We are testing for dysfunction but we are also testing for protective-sensations and safety mechanisms.
With regards to peripheral nerve lesions this blog will discuss only the sensory deficits and how we might be able to distinguish the pattern of sensory loss related to a spinal nerve level or peripheral nerve lesion. As clinicians it is pertinent that we can differentiate between cutaneous nerve distributions and spinal dermatomes in order to understand whether the lesion is affecting a spinal nerve or a peripheral nerve. Compared to testing for a CNS lesion, when looking at a PNS lesion a full sensory examination may not be necessary. Bilateral simultaneous stimulation is not required for peripheral testing - unless you are unsure if the patient is a reliable source of information. Other aspects of sensory assessment such as proprioception, stereognosis, graphaesthesia etc. are also not necessary (unless you don't know if you are dealing with a central or peripheral problem). What is important is to test light touch discrimination between areas of the affected limb. This is most commonly done in a dermatomal pattern. We are also expected to test for light touch, sharp/blunt, temperature and often two-point discrimination, as these test different parts of the peripheral nervous system (small vs large diameter nerve fibres).
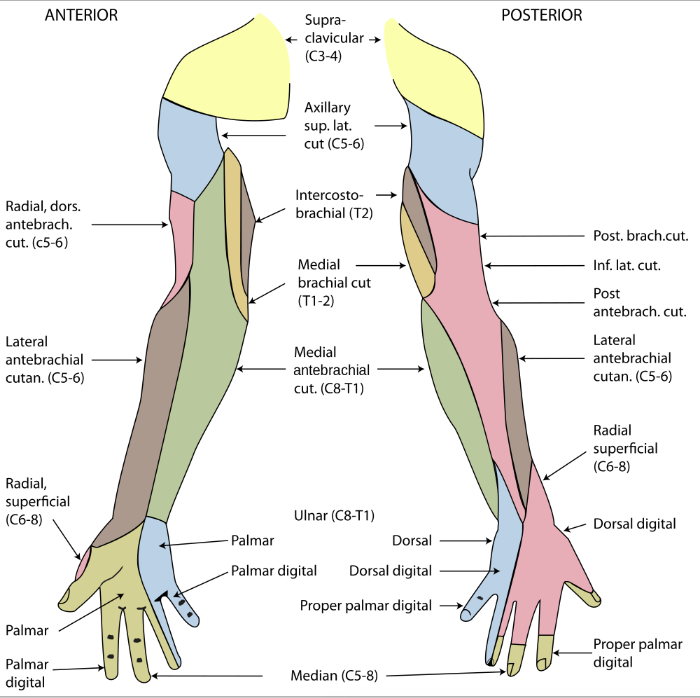
Dermatomes vs peripheral cutaneous nerves
What you may notice from the two images below is how the dermatomal pattern of a spinal level differs from a peripheral cutaneous nerve. This is something we all learnt in our training but it is easy to forget. There is no easy way of remembering all the nerve pathways, however, when learning this different maps I have found it helpful to draw out the distributions/areas of skin innervated on my own arm and leg. You can also keep a picture on your desk at work in case you forget.

Dermatome map of the body. Image source: Google Images

Upper & Lower motor neurone lesions
Clinically, we can often differentiate between upper and lower motor neurone lesions from the subjective history. For example;
- Does your patient have a medical history such as multiple sclerosis, stroke, or any condition impacting the central nervous system and ascending/descending spinal tracts.
- Does your patient have a medical condition causing a polyneuropathy such as diabetes mellitus (which presents with a sock/glove distribution of sensory loss)?
- Does your patient have a history of a specific disorder causing spinal nerve entrapment such as lumbar disc herniation with radiculopathy?
- Does your patient have a history of local trauma that may effect a peripheral nerve such as a fibular fracture with peroneal nerve palsy or an entrapment neuropathy such as carpal tunnel syndrome?
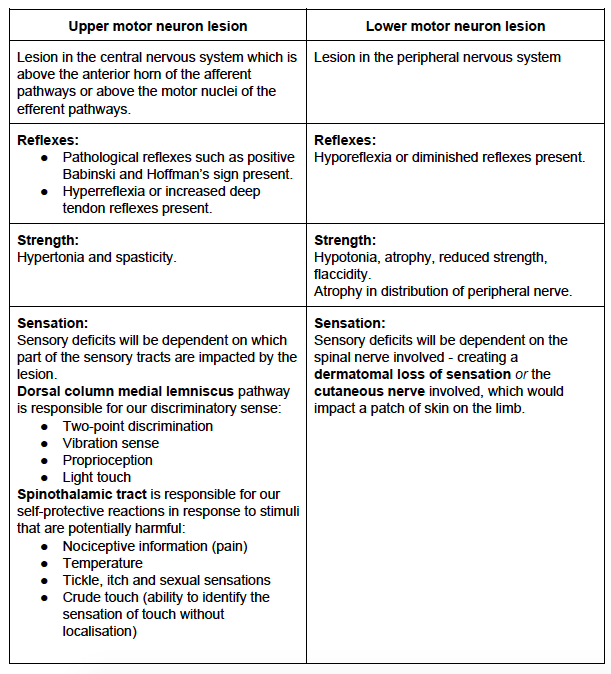
The history is crucial in understanding the mechanism of injury, nature, severity of symptoms, and contributing medical conditions. Below is a table that outlines main differences between UMNL and LMNL in further detail.
SENSATION TESTING PROCEDURES
EQUIPMENT & SET-UP
- For all sensory assessment procedures test the affected side/area first then the unaffected side. This prevents the retained memory of the last stimulus compromising the test.
- Patient Position - supported long sitting, ensure the lower limb is exposed to the hip joint and upper limb exposed to acromion. The trunk must be exposed for area tested.
- Equipment Required - cotton wool/tissue, 2 paper clips, test tubes filled with hot/cold water.
It is generally recommended that you begin your assessment with light touch. This is a fine discriminatory sense and if this sense is impaired then deeper sensations will often too be impaired as they belong to the same sensory tract (dorsal medial lemniscus tract). For example, if you cannot localise light touch, then the ability to localise joint position is often unlikely (proprioception).
As you may have read from the previous blog on sensation, it is normally conducted in a distal-to-proximal fashion as this saves time and allows for multiple dermatomes to be tested simultaneously without testing the entire dermatome distribution. If a deficit is noted, then further examination is required to specifically map out the impairment. Essentially the first aim is to identify is sensation is intact or impaired, and the second aim is to map out the distribution of sensory loss on the given limb and determine if this is in the distribution of a cutaneous nerve, spinal nerve or multiple nerves.
Let's go over some of the specifics of sensory testing in regards to three tests - light touch, sharp/blunt and two-point discrimination.
1) Light touch testing - ABILITY TO LOCALISE
Explanation to the Patient

Image source: Google Images
- Explain procedure in general terms, including purpose of assessment.
- "I am going to test the feeling in your arm/leg/trunk, let me know what you feel by responding with yes or no".
Testing Procedure
- Commence testing in area of suspected impaired sensation.
- Start distally in arm/leg, in a random sequence lightly but rapidly stroke a small area of patient's skin on different surfaces using a cotton bud or tissue, use equal pressure throughout all tests. (Light pressure means not being able to hear the stroke of the cotton bud on the skin.)
- After each stroke await a response from patient without prompting them.
- If the patient responds, ask them what it feels like and where (patient will point to the location).
- Ensure when changing surfaces (and moving the limb for better access) you use as little manual handling as possible to reduce sensation learning.
- Once you have assessed the affected side move to unaffected side & repeat.
- Then alternate between left and right sides in a random sequence.
- Documentation should include either a pictorial representation or a detailed description of the absent sensation.
- If you are describing the change in sensation you may choose to ask the patient to rate the intensity of what they feel compared to the unaffected side. Usually a difference of 20% i.e. 8/10 is considered within normal limits.
1) LIGHT TOUCH TESTING - TESTING BETWEEN AREAS FOR DIMINISHED/ALTERED SENSATION
Explanation to the Patient
- "I will now test if any areas feel different than others" (indicates all types of sensations).
- "I will touch one area of skin then immediately touch another area".
- "I need you to tell me how one area feels compared to another".
- "You may keep your eyes open".
- During testing, I continually say "does that feel the same as that?"
Testing Procedure
- In a systematic way, moving from distal to proximal on all surfaces, lightly stroke one area immediately followed by another area (either the same region on the opposite side, or another area on the same side).
- Ask the patient what they feel, or "does that feel the same as that?"
- If the patient answers no, the further question the difference to understand if there is paraesthesia, numbness, sensitivity or dysaesthesia (abnormal feelings like prickling, crawling, burning etc.)
2) Sharp/blunt testing
Testing Procedures
- Start in the area where the patient had difficulties in sharp/blunt discrimination & using equal pressure on both paper clips touch them 4 to 5cm apart.
- Ask the patient if they feel one or two points of pressure.
- Gradually lift & move the points closer together, each time asking if the patient feels one or two points.
- Keep moving them closer until the patients reports feeling one point.
- Repeat at various spots in that area, documenting the distance between the two points.
- NB: it is normal to have differences at different parts of the body, however it is important to note where responses are different between sides.
3) two-point discrimination
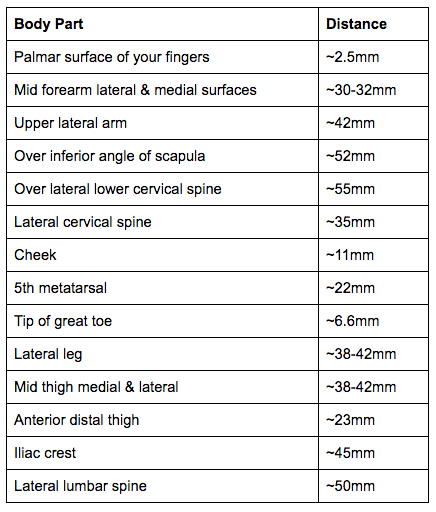
Just as it is important to know the mapping of dermatomes and cutaneous nerves in the detection of light touch, it is also important to know the expected distances for two-point discrimination in the body to allow for accurate interpretation of the information we gain from the assessment.
Two-point discrimination distances adapted from O'Sullivan et al., 2013.
Documentation
The final aspect of sensory testing that I wanted to cover with this blog is terminology (O'Sullivan et al., 2013). Here are a few words...
Words relating to pain:
- Analgesia - the complete loss of pain sensitivity.
- Dysesthesia - touch sensation experienced as pain.
- Hyperalgesia - increased sensitivity to pain and hypalgesia - decreased sensitivity to pain.
- Allodynia - pain provoked by non-noxious stimulus.
- Causalgia - painful burning sensation (usually along the distribution of a nerve).
Words relating to sensation:
- Atopognosia - inability to localise a sensation.
- Hyperesthesia - increase sensitivity to a sensory stimuli and hypesthesia - decreased sensitivity to a sensory stimuli.
- Paraesthesia - abnormal sensation such as pins and needles, numbness, tingling.
- Thigmanesthesia - loss of light touch sensibility .
Words relating to temperature:
- Thermanalgesia - inability to perceive heat.
- Thermanesthesia - inability to perceive sensations of heat or cold.
- Thermhyperesthesia - increased sensitivity to temperature and thermhypesthesia - decreased temperature sensibility.
When I think back to my university days, I remember being quite overwhelmed with the number of sensory tests we learnt in neurology and musculoskeletal subjects. Always remember that when put in the context of a full neurological screen (deep tendon reflexes, strength and sensation) the clinical patterns are much easier to recognise. However, it is definitely important to know the purpose and method for these sensory assessments and the most common tests you will use such as light touch, sharp/blunt discrimination, and temperature. The focus initially is to rule out any sensory impairment during a neurological exam and once sensory impairment has been detected, you can then be more specific in your mapping of the distribution and description of the symptoms.
Sian
References:
Adams RD, Victor M and Ropper MD (2001): Principles of Neurology (7th ed.) New York: McGraw Hill. (Chapter 3 & 9).
Fredericks C and Saladin L (1996): Pathophysiology of the Motor Systems: Principles and Clinical Presentations. Philadelphia: F.A Davis pp. 275 - 288.
Kingsley R.E (2000): Concise Text of Neuroscience. (2nd ed.) Philadelphia: Lippincott, Williams & Wilkins. (Chapter 6, Appendix 2).
Nolte J (1999): The Human Brain: An Introduction to its Functional Anatomy. (4th ed.) St Louis: Mosby Year Book. (Chapter 10).
Nolte J and Angevine JB (1995): The Human Brain in Photographs and Diagrams. (1st ed.) St Louis: Mosby Year Book Inc.
O'Sullivan, S. B., Schmitz, T. J., & Fulk, G. (2013). Physical rehabilitation. FA Davis.